Sep 202012
 
cleaning shake straws

Today’s Thursday Thriftiness is on an easy way to clean plastic straws – those reusable plastic straws – shake, sippy, water bottle, curly – any reusable straw.  They’re really hard to get clean. And should you think yours are getting clean by simply washing them the traditional way – they aren’t.  I am choosing to highlight shake straws for the purpose of this writing because they are used every day in our home.

These straws come in the covered cups I buy for my son.  I also confiscate these straws when we are at Friendly’s if they happen to come with any of our beverages – I’ve paid for them right?  So why not take them home and reuse them?  I have quite the stash, so I can get away with washing them the traditional way and then set them aside for a deep cleaning.

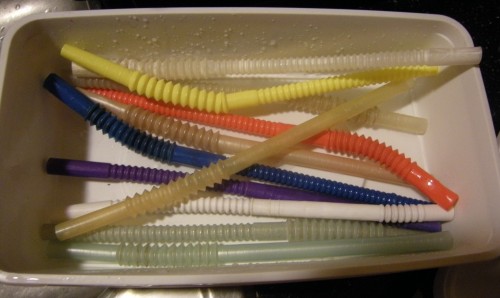
I promise you that washing plastic straws such as these the traditional way does NOT get them clean. They may look clean – but they really aren’t, as you’ll see in the last step.  If you put the beverage in the fridge with the straw – you’re doomed at being able to get the build up out of the ridges the traditional way (take a look at the first picture below.  You’ll see build-up in the ridges from my son’s LNA’s not taking the straw out and washing it out before putting the cup with the straw in the fridge).  Even if they are washed out – a build up occurs on the inside of the straws – you just don’t notice it until you’ve deep cleaned them.

Easy Way to Clean Plastic Straws

In this picture, these straws have been washed in dish detergent and had water run through them. Notice the clearer straws – you can see gunk in the ridges despite being cleaned (the traditional way).

You can enlarge that picture – simply click on it.  Were you able to see that nasty gunk?   Some of straws have gunk from flavored milk, others from juices.  Disgusting huh!?!  Don’t fret though! They can be saved!

Continue reading »

Jun 192012
 
lasagna noodles

One of my most favorite dishes is lasagna BUT I always hated to parboil the noodles.  Luckily for me, long before

lasagna noodles

No need to boil OR use the no boil noodles

the no boil lasagna noodles came out on the market, I learned of a way to make my lasagna without having to parboil the noodles. Till this day, I will not spend the extra money on the no boil noodles – that just isn’t necessary.  You can do the same too.

If you’re building a lasagna using a 9×13 pan you’ll need to use an additional cup of sauce.  If you prefer your lasagna to be saucier – then you’ll need to use at least two cups, or thin the sauce with water.  I prefer not to thin the sauce with water as I make my own sauce and I want that Italian flavor to be full.  The reason for the extra sauce is because the noodles will pull the liquid from the sauce to aid in cooking them.

Now all you have to do is build your lasagna.  Start building it  by layering extra sauce on the bottom of the pan – not all of it, but about a third of it.  Then continue to layer your ingredients adding extra sauce to each layer.  When you’ve completely built your lasagna cover it tightly with foil(very important) and put it in the oven to bake.  I also spray the foil with a non-stick spray.  You will need to let it bake an additional 15-30 minutes longer than normal.  Once it comes out of the oven I always let mine stand a few minutes before I uncover it.  I then remove the cover and serve.

I’ve never had any trouble with the noodles not cooking.  I have however made the mistake of not using enough  sauce but that was my own fault.  That time – I decided I was going to make this HUGE pan of lasagna and didn’t have enough sauce to start out with.  A lesson learned.

May 242012
 
plastic bakery containers


I’m horrible when it comes to throwing out containers.  I always think there just has to be a use for them at some point – so I save them.  One of my favorite saves that I’ve found uses for are store bakery containers like these:

bakery containers

I know – you’re saying the frosting is yucky to have to clean out – but really it isn’t if you run hot water over it and then wash with some good dish detergent.  Invert them and they’ are great for holding crayons, fabric, craft projects, fish – Yes, I said fish – take a look:

Continue reading »

Mar 292012
 

Prom time is nearing very fast and it tends to be a costly event.  Most all teens want to go but it’s not always affordable for all families.  That being said, there are ways to save on prom expenses and still make this a very memorable time for your prom-goers.  One doesn’t need to buy the most expensive dress, the fanciest shoes, or even have a $100 hairdo.  Heck – most of the girl’s take off their shoes before the night is half way through; and I bet the guys lose the ties somewhere along the lines as well.  So, how can you save?

Continue reading »

Apr 062011
 
I came across this project and I so wish I had known about it 13 yrs. ago when my daughter was small.  I see this project as being extremely customizable.  One can use wrapping paper from their child’s first bday and so on through the years.  They can use shoelaces from their child’s shoes.

Since I am 13 yrs too late to use wrapping paper from my daughter’s first bday; I will customize the scrapbook using her clothing I have saved throughout the years. I will cut them up and fuse the pieces to hold them all together for the wrapping paper. I will also use strips of the clothing I have and make a tie instead of a shoelace.  I could also enlarge a picture from the event to use as wrapping paper. I will then cover with an iron on vinyl to preserve the clothing from stains etc.

I bet you are thinking I must be a huge pack-rat…well that is true to a point.  If I think there’s a way to recycle something…I’ll hold on to it…I love containers (read this short post on a couple of my uses for different containers). I tell ya, some of the things I have saved, have come in very handy!  As far as the my daughter’s articles of clothing I have saved all these years, I set a mission into place back 13 yrs ago. I am going to make her a quilt, out of her most favorite clothing articles, since she was a baby.  I want to give this to her for her 18th birthday.  Even using the clothing for the scrapbooks, I should have plenty left over for the quilt. As far as the scrapbooks of her…I bought all the stuff 13 yrs ago…and it still waits for me in the closet.
What you need:

  • Cardboard (cereal boxes work well)
  • Used gift wrap
  • Brown paper bags
  • Slightly used office paper
  • Old shoelaces, ribbons, string or yarn
  • Hole punch
  • Scissors
  • Tape
How to make it
  1. First cut the cardboard to be the size you want your scrapbook to be. You will need 2 pieces the same size. Or you may cut one large piece and fold it in half.
  2. Wrap the cardboard up like a present with the old wrapping paper. Try to do the backside neatly as this will be the inside cover of your scrapbook. You may cut another sheet of wrapping paper to tape over the inside to hide all your tape marks.
  3. Cut 10-12 sheets of slightly used office paper, or cut a paper bag into pages in the size of pages you want.
  4. Punch 2 holes along the side (spine) of the front and back cover (see picture). Then punch holes in the pages to match the cover. Make sure they are equal.
  5. Put the pages inside and string the holes with the shoelace or ribbon. Tie this into a bow. Add more pages as needed.
  6. Fill with your favorite memories, pictures or words
Find this project, and others, at Envirokids

Apr 052011
 
Easter is coming and I came across this activity which I thought was really cool…not as convenient as store bought coloring kits, but environmentally friendly.  You would use some (or all) of the following ingredients:

  1. Items used to create various colors of dye:
  • Pink/red: Pomegranate juice, red onion skins, beets, chopped rhubarb stalks, cranberry juice, red grape juice
  • Orange: Yellow onion skins, paprika, chili powder
  • Yellow: Orange or lemon peels, shredded carrot, celery seed, ground cumin
  • Green: Spinach
  • Blue: Red cabbage, blueberry juice, blackberries, purple grape juice
  • Brown: Dill seeds, black walnut shells, instant coffee, tea

You can get the directions in complete HERE.  They have other projects too…click on the link at the bottom of the page that says “more projects” :-).  How cool is this!?….Have fun!

Jan 212011
 
THE MANY USES FOR APPLE CIDER VINEGAR
 
For all the mommies who use cloth diapers…when you launder then add 1/4 cup of apple cider vinegar to the final rinse water.  This will make them softer and help prevent diaper rash.
Anti-inflammatory/antibacterial agent:  When mixing sea salt with apple cider vinegar and applying it to sprains, Ringworm, nail fungus, bunions, corns, calluses, warts, shingles, boil, ant black fly, mosquito bites, wasp, bee stings and even poison ivy it acts as a powerful antibacterial agent and anti-inflammatory.
For a bloody nose: apply a compress of 2 tsp. apple cider vinegar and 1 cup water to the base of the neck to the top of the nose- this helps constrict blood vessels.
Bugs: Repel lice and bed bugs with a combination of the essential oils of tea tree, rosemary, lavender, and peppermint.  Make them into a spray and spray on hair and bedding.
Digestive: It is to be believed that apple cider vinegar improves digestive ailments, correcting constipation, improving digestion and increasing one’s metabolic rate.  One cup of warm water mixed with one tbsp apple cider vinegar will help heartburn when sipped slowly.
Indigestion, nausea, and motion sickness is claimed to improve when you drink a mix of 2 tsp. of apple cider vinegar and raw honey in a glass of warm water daily.
Congested anyone?  This is a good one….mix 2 tsp. apple cider vinegar and honey in a cup of hot water and drink 3 times a day.  It breaks up mucus congestion and cough.  Honey, in itself, is known to calm the airways of asthmatics.
GDPR Cookie Consent with Real Cookie Banner